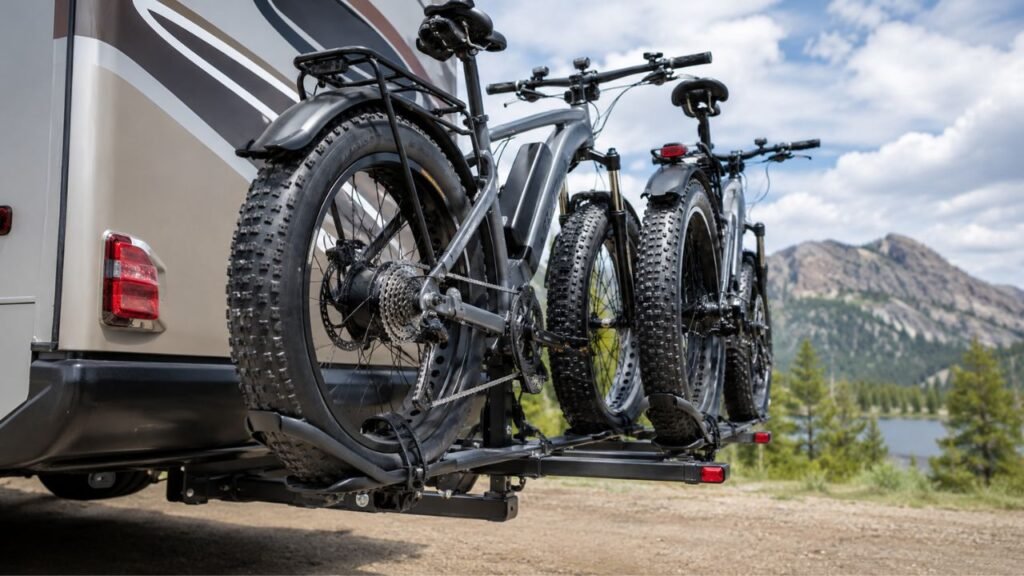
You secure fat-tire bikes on narrow RV rack trays by using properly sized wheel holders, approved fat-tire adapters, or a compatible replacement rack. Longer straps may help when the tray already supports the tire, but straps alone should not compensate for an undersized wheel tray.
In this guide, I’ll show you how to check the fit, secure both wheels correctly, reduce movement, and decide when upgrading the rack is the safer choice.
Key Takeaways
- A wider tire needs proper wheel support, not only a longer strap.
- Check the rack’s maximum tire width before adding accessories.
- Use manufacturer-approved fat-tire trays or conversion kits when available.
- Make sure any adapter still allows the rack’s intended RV use.
- Secondary straps can reduce movement but should remain backup retention.
- Check bike weight and rack capacity separately from tire-width compatibility.
- Replace the rack when the wheel cannot sit securely inside its supports.
Why Narrow Wheel Trays Are a Problem for Fat-Tire Bikes
A narrow tray becomes a problem when it cannot support the tire as designed. The bike may still look secure while parked, but towing introduces repeated bouncing and side-to-side movement.
The Tire May Sit on Top of the Tray
Most fat-bike tires are considerably wider than standard bicycle tires. When the tray is too narrow, the tire may rest on its edges.
That leaves less support underneath the wheel. The tire can also lean toward one side under vibration.
You should not judge fit only by appearance, though. Some racks intentionally use narrow-looking cradles that still support wider tires.
The rack manufacturer’s tire-width specification is the number that matters most.
The Original Wheel Strap May Be Too Short
A standard wheel strap may barely reach around a fat tire. That can leave too little strap inside the buckle.
Even when it closes, the strap may sit at an awkward angle.
A proper fat-tire strap should wrap around the tire cleanly. It should also engage the buckle exactly as the rack requires.
If the tray supports your tire but the strap does not reach, an approved strap extender may solve the problem.
The Wheel Can Shift Sideways or Bounce Upward
A narrow tray offers less lateral support around a wide tire. That matters more behind an RV than behind many passenger vehicles.
The rack experiences constant vibration while you drive. Potholes, bridge joints, campground roads, and dips add more movement.
If the tire is already perched poorly, repeated motion can gradually move it farther from its intended position.
Heavy Fat-Tire E-Bikes Increase the Stress
Many fat-tire bikes are also electric bikes. That usually means considerably more weight on each wheel holder.
A heavy bike places greater loads on the:
- Wheel trays
- Wheel straps
- Frame clamps
- Rack arms
- Hitch connection
- Anti-wobble hardware
A tray that seems barely acceptable for a light bike may become much less forgiving with a heavy e-bike.
First, Determine Whether Your Fat Tire Actually Fits the Rack
Before buying straps or adapters, confirm what part of the setup is actually incompatible. A few measurements can prevent you from solving the wrong problem.
Check the Rack’s Maximum Tire Width
Start with your exact bike-rack model. Look for its listed maximum tire width.
You may see specifications such as:
- Up to 3 inches
- Up to 4 inches
- Up to 5 inches
- Up to 5 inches with an optional adapter
Pay close attention to the wording.
A rack that accepts 5-inch tires only with an accessory is different from one designed for 5-inch tires from the start.
Measure Your Actual Tire Width
Do not rely entirely on the number printed on the tire.
Inflation pressure, rim width, and tire design can change its actual width.
Measure across the widest part of the inflated tire. Then compare that measurement with the rack specification.
If your tire exceeds the stated maximum, do not force it into place.
Check Wheel Diameter and Wheelbase
Tire width is only one part of bike-rack compatibility.
You should also check:
- Wheel diameter
- Wheelbase
- Wheel-holder spacing
- Hook position
- Fender clearance
- Rear derailleur clearance
Small-diameter fat-bike wheels can create different problems from 26-inch or 27.5-inch wheels.
Your tire may fit the tray while the rack arm still cannot hold the wheel correctly.
Check the Per-Bike Weight Limit
Now look at the rack’s weight rating.
Do not assume tire compatibility means weight compatibility.
A rack might accommodate a 5-inch tire but still have a lower weight limit than your e-bike.
Weigh the bike as it will travel whenever possible.
Include anything staying attached, such as:
- Rear racks
- Baskets
- Fenders
- Bags
- Locks
- Accessories
If you remove the battery for travel, calculate the weight without it.
Confirm the Rack Is Approved for Your RV Type
This is especially important.
A bike rack may be described as RV-compatible without being approved for every RV.
Check whether the manufacturer allows your specific application, including:
- Class A motorhome
- Class B motorhome
- Class C motorhome
- Fifth wheel
- Travel trailer
- Towed vehicle
Travel trailers can create particularly strong rear movement.
Never assume that a rack approved for a motorhome is automatically suitable for a travel trailer.
Best Ways to Secure a Fat-Tire Bike When the Wheel Trays Are Too Narrow
There are several possible solutions, but they are not equally safe. I would start with the rack manufacturer’s intended solution before improvising anything.
Install Manufacturer-Approved Fat-Tire Wheel Holders
Wider wheel holders are usually the cleanest fix.
These accessories replace or modify the original cradle so the tire receives proper support.
A good wide holder helps control:
- Side-to-side movement
- Tire positioning
- Strap angle
- Wheel lift
- Loading consistency
This is much better than balancing a wide tire on narrow tray edges.
Check that the accessory matches your exact rack model.
Use an Approved Fat-Tire Conversion Kit
Some rack manufacturers sell complete fat-tire conversion kits.
These kits may include:
- Wider wheel holders
- Longer wheel straps
- Different mounting hardware
- Spacers
- Wheel adapters
Using the complete kit can be safer than mixing unrelated accessories.
One important detail deserves extra attention. Adding an accessory can sometimes change how a rack is approved for RV use.
Always verify that the modified rack remains suitable for your RV.
Use a Strap Extender When the Tray Already Fits
Sometimes the tray itself supports the tire correctly. The only problem is that the standard strap is too short.
That is where a proper strap extender makes sense.
The tire should still sit where the rack manufacturer intended.
A longer strap should only solve the strap-length problem. It should not be expected to turn an undersized tray into a wide one.
Add Approved Secondary Wheel Retention
A secondary strap can add useful redundancy.
It may help reduce:
- Wheel lift
- Tire movement
- Side-to-side rocking
- Strap flutter
Use a soft, strong strap that cannot damage the wheel.
Route it around solid, approved points on the rack. Keep it away from brake rotors, spokes, cables, and sharp edges.
Remember that this is backup retention.
The rack’s original wheel-holding system should still perform the primary job.
Stabilize the Frame Where the Rack Allows It
Some platform racks use a center mast or frame-retention arm.
When designed for your bicycle, this additional contact point can reduce bike movement.
Make sure the clamp contacts an approved frame area.
Be especially careful with:
- Carbon frames
- Step-through frames
- Brake hoses
- Shift cables
- Battery housings
- Painted surfaces
Never force a clamp into a position the rack was not designed to use.
Replace the Rack When Necessary
Sometimes there is no worthwhile modification.
Replacing the rack becomes the better choice when:
- No approved wide tray exists
- The tire exceeds maximum width
- The bike exceeds weight capacity
- The adapter changes RV compatibility
- The wheel hook cannot sit correctly
- The rack is not approved for your RV
- The bike remains unstable after correct setup
A different rack costs more than extra straps, but it solves the actual compatibility problem.
Fat-Tire Bike Rack Fixes: What Works and What Does Not?
Different problems require different solutions. Use this table to quickly identify what your setup probably needs.
| Problem | Better Solution | Are Extra Straps Enough? | RV Compatibility Check? |
| Tire fits tray but stock strap is short | Approved strap extender | Usually, if properly approved | Yes |
| Tire exceeds rated tray width | Wider wheel holder or tray | No | Yes |
| Fat-tire conversion kit is available | Use the complete approved kit | Use supplied retention | Yes |
| Adapter changes RV approval | Replace or reconsider rack | No | Absolutely |
| Bike exceeds per-bike weight rating | Higher-capacity rack | No | Absolutely |
| Wheel fits but rocks sideways | Correct tray fit plus secondary retention | Sometimes as backup | Yes |
| Small fat wheel does not align correctly | Approved wheel adapter | Usually not | Yes |
| Rack is not approved for that RV type | Use another rack or location | No | Absolutely |
How to Secure the Bike After You Have a Compatible Fat-Tire Setup
Once the tray and tire are compatible, the remaining job is straightforward. Work through every retaining point instead of relying on one tight strap.
Step 1: Place Both Wheels Correctly
Load the bike so both wheels rest in their intended holders.
Look directly at each wheel before tightening anything.
The tire should not be balanced awkwardly on one side. It should also not be pushed against hardware or sharp edges.
Step 2: Center Each Tire
Make sure the tire sits naturally in the holder.
A wide tire may flex slightly around the cradle. That is different from sitting visibly crooked or unsupported.
Correct the position before tightening the straps.
Step 3: Secure the Primary Wheel Strap
Wrap the supplied strap around the tire according to the rack instructions.
Make sure it:
- Lies flat
- Reaches the buckle comfortably
- Engages fully
- Does not twist
- Avoids the brake rotor
Pull it snug enough to prevent movement.
You usually do not need extreme force.
Step 4: Position the Wheel Hook Correctly
If your rack uses a wheel hook, place it where the manufacturer specifies.
Do not simply rest it somewhere near the highest point.
A poorly positioned hook can allow the wheel to shift even when it initially feels tight.
Also make sure the hook does not press against a fender.
Step 5: Secure the Rear Wheel
The rear wheel matters just as much as the front.
A loosely retained rear wheel can bounce, twist, or move sideways.
Use the supplied strap or wheel-retention system exactly as intended.
Step 6: Attach Frame Retention if Required
Some racks use a frame clamp along with wheel straps.
Attach it to the correct contact point and tighten it securely.
Avoid crushing lightweight tubes or damaging painted surfaces.
Step 7: Add Secondary Retention if Appropriate
Now you can add a backup strap if your rack setup allows one.
Keep it snug rather than excessively tight.
Its job is to limit additional movement if the primary system loosens slightly.
Step 8: Perform a Movement Test
Before driving, grip the bike and gently push it in several directions.
Look for movement at the:
- Tires
- Wheel trays
- Rack arms
- Hitch connection
- Frame clamp
Some flex is normal.
The wheel should not climb out of its holder or slide significantly sideways.
Can You Use Ratchet Straps or Heavy-Duty Velcro Instead?
Ratchet straps or heavy-duty hook-and-loop straps can sometimes provide secondary retention, but they should not replace a properly fitting wheel tray. If the tire is sitting outside the rack’s rated support area, tightening another strap does not correct the underlying incompatibility.
Ratchet straps also create a risk of overtightening. It is easy to apply much more force than a bicycle wheel or component needs.
That can damage:
- Rims
- Fenders
- Spokes
- Brake rotors
- Painted surfaces
- Carbon components
If you use an auxiliary strap, choose a controlled attachment point. Tighten it enough to remove unwanted movement without crushing anything.
Avoid ordinary bungee cords as primary bike retention. Their stretch makes them poorly suited for controlling a heavy bike during repeated RV movement.
How Tight Should Fat-Tire Bike Rack Straps Be?
The straps should be tight enough to keep the tire seated during a firm hand-check. They should not be so tight that they deform the wheel, crush a fender, or excessively compress the tire.
Watch the buckle while tightening. Make sure enough strap remains engaged for the mechanism to work correctly.
After tightening, push and pull the wheel with your hands.
If the wheel climbs out of the tray, the problem may be tray compatibility rather than strap tension.
Avoid assuming that tighter always means safer.
RV Approval Matters More Than the Fat-Tire Adapter
RV use deserves separate attention because rack ratings often depend on the vehicle type. Always check your exact combination before assuming an accessory is safe.
Motorhomes
Some racks are designed and tested for motorhome use.
That still does not mean every configuration is allowed.
Check the rack size, receiver size, bike capacity, and accessory restrictions.
Fifth Wheels
Fifth-wheel compatibility also varies by manufacturer.
Pay attention to:
- Receiver construction
- Rack weight
- Per-bike rating
- Hitch extensions
- Adapter use
A heavy fat-tire e-bike can quickly consume available capacity.
Travel Trailers
Travel trailers are especially important to check.
The rack sits far behind the trailer axles in many installations. That location experiences repeated movement and leverage.
Some bike racks approved for motorhomes are not approved for travel trailers.
Check the actual wording instead of relying on an “RV” label.
Chassis-Mounted Receivers
A strong bike rack still depends on what holds it.
Some RV applications require a receiver connected directly to the chassis.
A bumper-mounted receiver or improvised adapter may have a much lower capacity.
Treat every connection as part of the same system.
Your safe limit is determined by the lowest-rated component.
Why an RV Makes a Marginal Wheel Fit More Risky
A barely acceptable tire fit becomes more concerning once the RV starts moving. The rear of the vehicle can repeatedly load and unload the bike rack throughout the trip.
Common forces include:
- Vertical bouncing over road joints
- Side-to-side rocking
- Pothole impacts
- Rough campground roads
- Long rear overhang leverage
- Repeated hitch movement
- Strap settling
- Tire movement inside shallow trays
That is why I would not accept a setup simply because it looks stable in the driveway.
The goal is a tire that remains supported after hours of repeated movement.
Special Considerations for Fat-Tire E-Bikes
Fat-tire e-bikes combine large tires with substantial weight. Check several additional details before carrying them behind your RV.
Calculate the Actual Travel Weight
Look beyond the advertised bicycle weight.
Include accessories that remain attached during travel.
A bike can become noticeably heavier with:
- Battery
- Rear cargo rack
- Basket
- Lock
- Mirrors
- Bags
- Child accessories
Compare that number with the rack’s per-bike capacity.
Remove the Battery When Appropriate
Removing the battery can make loading easier and reduce rack weight.
It may also keep the battery away from road spray and prolonged vibration.
Only remove and store it according to the bike manufacturer’s instructions.
Secure the battery inside the vehicle so it cannot move during travel.
Do Not Confuse Tire Capacity With Weight Capacity
This mistake is easy to make.
A rack accepting a 5-inch tire is not automatically rated for a 70-pound e-bike.
You need both specifications to work.
Check:
Tire width + bike weight + RV compatibility.
All three matter.
Watch Fenders and Wheel Hooks
Many e-bikes have full fenders.
A wheel hook designed to contact the tire may not work correctly over a fender.
Do not clamp the hook onto a fender unless the rack specifically allows it.
If proper hook placement is impossible, the rack may not suit that bicycle.
Mistakes to Avoid When Securing Fat Tires on Narrow Trays
Small shortcuts can create large problems once the RV starts moving.
Avoid these common mistakes:
- Forcing a wide tire into an undersized tray
- Assuming a longer strap automatically makes the rack compatible
- Using bungee cords as primary retention
- Overtightening heavy ratchet straps
- Routing straps across brake rotors
- Letting straps rub against spokes
- Ignoring incorrect wheel-hook placement
- Balancing tires on tray edges
- Using an adapter without checking RV approval
- Assuming all RV types have the same rack rating
- Exceeding the rack’s per-bike weight limit
- Ignoring hitch or receiver capacity
- Using an unapproved hitch extender
- Leaving loose accessories attached
- Skipping inspections during long trips
Before Driving: Fat-Tire Bike Security Checklist
A quick inspection before departure can catch most setup problems. I would use the same routine every time you load the bikes.
- Confirm the tire width fits the rack specification.
- Make sure both wheels sit correctly in their holders.
- Check every wheel strap for full buckle engagement.
- Position wheel hooks exactly where required.
- Attach frame retention when the rack uses it.
- Add secondary straps only where appropriate.
- Keep straps away from brake rotors and spokes.
- Check bike weight against the per-bike limit.
- Confirm installed accessories remain approved for RV use.
- Tighten the hitch pin and anti-wobble hardware.
- Verify the rack cannot contact the RV body.
- Keep pedals from striking another bicycle.
- Secure handlebars if unwanted rotation is possible.
- Remove bottles, loose bags, and detachable accessories.
- Confirm lights and the license plate remain visible where required.
Check the setup again after your first driving stretch.
You should also inspect it after unusually rough roads or large bumps.
When Should You Stop Modifying the Rack and Replace It?
Not every narrow rack deserves another accessory. Sometimes a purpose-built fat-tire rack is the simpler and safer solution.
Consider replacing the rack when:
- No approved fat-tire holder is available.
- Your tire exceeds the published maximum width.
- A conversion accessory changes RV compatibility.
- Your bike exceeds the RV-use weight limit.
- The wheel will not remain centered.
- Proper wheel-hook placement is impossible.
- Your RV type is excluded by the manufacturer.
- The rack requires unsupported modifications.
- Excessive movement remains after proper adjustment.
Think of it this way.
A stronger strap cannot fix an incompatible rack.
You want the rack to support the bike mechanically before straps add retention.
Final Verdict
The best way to secure fat-tire bikes on narrow RV wheel trays is to correct the fit first. Use approved wide wheel holders, a proper fat-tire conversion kit, or a rack already designed for your tire width.
A longer strap can be perfectly useful when the tray itself supports the tire. Secondary straps can also reduce movement during travel. Neither one should compensate for a wheel that is perched on an undersized tray.
Before towing, verify three things together: tire width, bike weight, and RV compatibility. When all three match, your bike has a much better chance of staying secure through highway miles, campground roads, and normal RV vibration.
Related FAQs
Can a 4-Inch Fat Tire Fit in a Narrow Bike Rack Tray?
It can if the rack manufacturer specifically rates that tray for a 4-inch tire. Some trays look narrow but are designed to support wide tires. If your tire exceeds the published limit, use an approved wider holder or another rack.
Can I Just Use Longer Straps for Fat-Tire Bikes?
Yes, but only when the wheel tray already supports your tire width correctly. A longer strap solves insufficient strap length. It does not make an undersized or incompatible tray safe.
Are Ratchet Straps Safe for Securing Fat Bikes to an RV Rack?
They can work as secondary retention when routed carefully and tightened moderately. Avoid overtightening them around rims, fenders, spokes, or delicate bike components. The rack’s original securing system should remain primary.
Do I Need a Special Bike Rack for 5-Inch Fat Tires?
You need a rack or approved accessory rated for that tire width. Some standard racks accept 5-inch tires with conversion kits, while others require wider wheel holders or complete replacement.
Do Fat-Tire Adapters Change an RV Bike Rack’s Rating?
They can. An accessory may change weight capacity or approved vehicle applications. Always check whether the rack remains approved for your specific RV after installing the fat-tire accessory.
Should Both Wheels Be Strapped on an RV Bike Rack?
Use every wheel-retention point required by the rack manufacturer. On many platform racks, both wheels require secure retention. Never intentionally leave a required wheel strap unused.
Can I Carry a Fat-Tire E-Bike on an RV Bike Rack?
Yes, if the rack supports the tire width, bike weight, receiver setup, and specific RV type. Tire compatibility alone does not mean the rack can safely carry a heavy e-bike.
Should I Remove My E-Bike Battery Before RV Travel?
Removing the battery can reduce rack weight and make loading easier. Follow your e-bike manufacturer’s transport instructions and store the removed battery securely inside the vehicle.
How Often Should I Recheck Fat-Tire Bikes While Traveling?
Check everything before departure, again after the first portion of the drive, and after rough roads or significant bumps. Also inspect the rack whenever you notice unusual movement.
Is an RV-Approved Bike Rack Safe on a Travel Trailer?
Not automatically. Some racks approved for motorhomes or fifth wheels are specifically excluded from travel-trailer use. Confirm that your exact rack is approved for your exact RV type.

Jack Collins specializes in RV routes, trail access, and travel logistics. His how-to articles help RV and trailer owners plan smoother trips and avoid common mistakes. Every review focuses on performance, safety, and value.