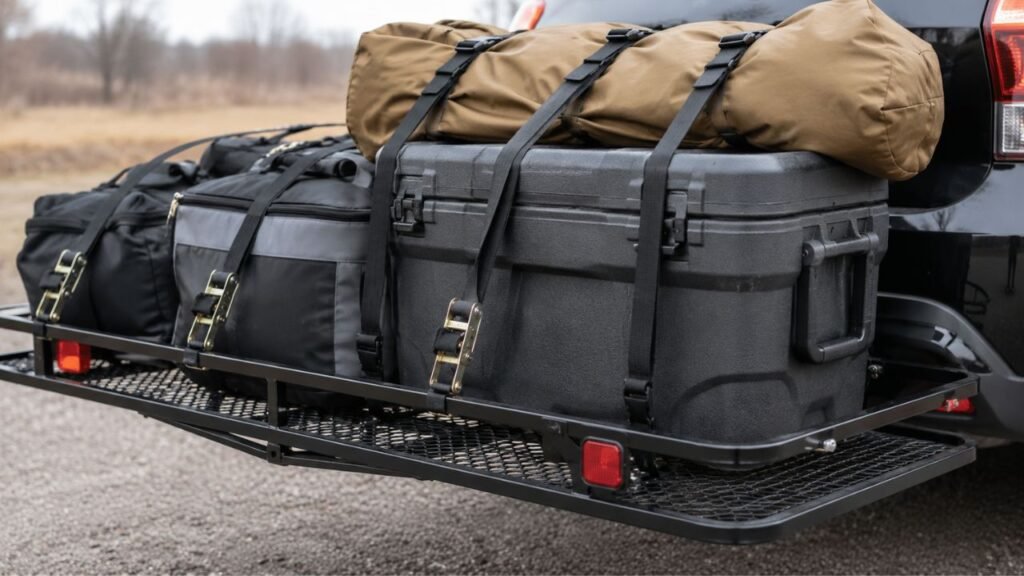
Cargo-carrier tie-down straps usually loosen because cargo settles, compresses, or shifts while driving. Hitch-carrier movement, poor strap routing, incorrect ratchet threading, worn hardware, and unlocked ratchets can also create unwanted slack.
In this guide, I’ll help you find exactly where that slack comes from. You’ll also learn how to keep your cargo stable without simply tightening every strap harder.
Key Takeaways
- Cargo settling is one of the most common loosening causes.
- Soft bags and boxes can compress after driving begins.
- A hitch carrier can move even when cargo seems secure.
- Incorrect ratchet threading can prevent proper tension from developing.
- Ratchet handles should finish completely closed and locked.
- Straps should control forward, backward, and sideways cargo movement.
- Loose strap tails should be secured before driving.
- Recheck your cargo after the first part of your trip.
- Damaged straps or faulty ratchets should be replaced, not trusted.
Why Do Tie-Down Straps Loosen on a Hitch Cargo Carrier?
A loose strap does not always mean the ratchet actually slipped. Sometimes the cargo, carrier, or attachment point moved enough to reduce tension. Finding which part changed makes the problem much easier to fix.
The Cargo Settles or Compresses
This is probably the first thing I would check.
Soft cargo often looks perfectly secure when you leave home. Then road vibration gradually compresses everything underneath the straps.
Duffel bags, blankets, camping gear, cardboard boxes, and soft cargo bags are common examples. Even tightly packed luggage can settle several minutes into a drive.
Imagine placing a ratchet strap over two stuffed duffel bags. You tighten the strap firmly before leaving. After twenty minutes, the bags settle into each other.
The strap has not necessarily moved through the ratchet. The load simply became shorter underneath it.
That creates slack.
When possible, pack soft cargo tightly before securing it. Filling empty spaces also reduces settling during travel.
The Cargo Shifts Between Stops, Turns, and Bumps
Your cargo experiences movement in several directions while driving.
Hard braking pushes the load forward. Acceleration can move it backward. Corners encourage sideways movement.
Bumps add vertical movement into the mix.
A strap running straight across the top may control downward movement well. However, it may do little to stop the load sliding toward one side.
Once cargo moves, the original strap angle changes. That can quickly reduce tension.
This is why stable packing matters before you even touch the ratchet.
Your straps should hold an already stable load in position. They should not be doing all the work themselves.
The Hitch Carrier Is Moving Inside the Receiver
This problem gets overlooked surprisingly often.
A hitch cargo carrier sits behind the vehicle’s rear axle. That location can make vertical bouncing more noticeable over dips and rough pavement.
Small amounts of receiver-to-shank play can also create movement.
You might see:
- The carrier rocking slightly inside the hitch receiver
- Vertical bouncing over bumps
- Movement around a folding joint
- Side-to-side wobble from receiver clearance
- More movement when cargo sits far behind the vehicle
That motion can let your cargo shift even when every strap remains locked.
An anti-rattle device may reduce compatible receiver movement. However, it should never replace proper cargo tie-downs.
You still need correctly rated straps and secure attachment points.
New Webbing Is Settling Under Its First Loads
New tie-down webbing may experience a small amount of initial elongation.
That does not mean every strap permanently stretches dramatically.
Different webbing materials behave differently under load. Polyester is commonly used because it generally offers lower stretch than nylon.
Still, new webbing can settle slightly when first tensioned heavily.
That small change can matter on a hitch carrier.
If your cargo also compresses, both effects can combine. A strap that felt firm during loading may become noticeably looser later.
Checking tension shortly after departure helps catch this early.
The Ratchet Was Threaded Incorrectly
A ratchet strap cannot work properly when the webbing is loaded incorrectly.
Start by pulling most loose webbing through the ratchet before tightening. You want enough material around the center spool for proper engagement.
However, you do not want the spool packed full.
Too much webbing can make the ratchet bind before proper tension develops. You might think the strap is tight when the mechanism is simply jammed.
Also make sure the webbing lies flat.
Twisted material can build uneven tension and rub against itself.
If you repeatedly run out of ratchet travel, release everything and start again. Pull more slack through by hand before ratcheting.
The Ratchet Handle Was Not Fully Locked
A ratchet handle should finish in its intended closed position.
Leaving it partially open can prevent the locking mechanism from fully engaging.
After tightening, fold the handle completely closed.
Then give the strap a firm pull with your hand. You should not see the webbing feeding backward through the ratchet.
If the handle will not remain closed, inspect the mechanism carefully.
A worn spring, damaged pawl, bent frame, or broken gear tooth may prevent reliable locking.
That strap should not be trusted with important cargo.
Hooks or Anchor Points Are Moving
Your tie-down system is only as stable as its attachment points.
A strap can remain perfectly tight around its ratchet while the hook changes position.
This often happens when hooks rest against rounded tubing. The hook rotates slightly during vibration and changes the strap angle.
You can also have trouble when straps attach to:
- Thin unsupported mesh
- Moving carrier joints
- Plastic trim
- Folding handles
- Weak accessory brackets
- Parts not designed for tie-down loads
Use manufacturer-provided tie-down locations whenever possible.
Otherwise, choose strong structural sections of the carrier frame that suit your strap hooks.
The Webbing Is Twisted or Rubbing an Edge
Webbing works best when it lies flat.
Twisted straps can create uneven load across the material. They may also move more easily as the load settles.
Sharp metal edges are another concern.
A hitch basket often contains welded corners, mesh edges, and brackets. Repeated rubbing against those areas can weaken the webbing.
Check the full strap path before driving.
If a strap crosses a potentially abrasive edge, use suitable edge protection. Never continue using a strap with significant cuts or damaged fibers.
The Ratchet or Strap Is Worn Out
Sometimes the problem really is the equipment.
A worn ratchet may look normal until you place it under tension.
Check for:
- Bent ratchet frames
- Missing or damaged gear teeth
- Weak locking springs
- Rust around moving components
- Hooks that have opened or deformed
- Torn stitching
- Cuts across the webbing
- Melted or glazed fibers
- Significant fraying
A little dirt can sometimes make a ratchet operate poorly. Cleaning moving parts may restore normal operation.
But damaged locking parts deserve replacement.
If you cannot trust the ratchet to stay locked, do not keep tightening it and hoping for the best.
The Loose Strap Tail Is Flapping
Long unused strap tails should not be left whipping behind your vehicle.
Wind can make loose webbing flap continuously. That movement creates noise, abrasion, and unnecessary vibration around your tie-down setup.
The tail can also catch nearby cargo or vehicle components.
After tightening the main strap, gather the excess webbing neatly.
Roll or tie it in a way that keeps it contained without interfering with the tensioned portion.
Quick Diagnosis: What Is Actually Causing Your Strap to Loosen?
Before tightening everything again, look for clues. The condition of the strap often tells you whether the problem comes from the cargo, ratchet, anchor point, or hitch carrier.
| What You Notice | Most Likely Cause | What to Inspect | Likely Fix |
| Strap feels loose, but webbing has not moved | Cargo settled or compressed | Bags, boxes, cooler position | Repack and re-tension |
| Webbing has moved through the ratchet | Incorrect threading or worn mechanism | Spool, pawl, gear teeth | Rethread or replace strap |
| Ratchet handle will not stay locked | Damaged ratchet hardware | Pawl, spring, teeth | Replace strap assembly |
| One strap always loosens first | Uneven cargo movement | Weight distribution and strap angle | Reposition cargo |
| Hooks move after bumps | Poor anchor geometry | Hook and carrier connection | Choose stronger anchor points |
| Entire carrier rocks | Receiver or carrier movement | Hitch pin, shank, folding joint | Correct hardware and reduce play |
| Strap loosens over duffel bags | Cargo compression | Soft luggage | Repack tightly and re-tension |
| Webbing becomes fuzzy or cut | Abrasion | Carrier edges and welds | Replace strap and protect edges |
How to Keep Cargo-Carrier Straps From Loosening
Keeping straps tight starts before you close the ratchet. Stable packing, strong attachment points, sensible strap angles, and proper tension all work together.
Pack the Carrier So Cargo Cannot Settle Easily
Start with the load itself.
Put heavier items low and closer to the vehicle whenever your carrier design allows it.
Avoid balancing heavy containers on top of soft bags.
Fill large empty gaps between items so everything supports each other. Small movement at the beginning can become much larger after repeated bumps.
Rigid storage totes can help with loose camping gear.
However, you still need to secure those totes properly.
Do not assume a heavy container will stay put because of its weight.
Position the Load Before Tightening the Straps
Arrange everything before applying serious strap tension.
Your cargo should already sit reasonably stable without leaning toward one side.
If a cooler rocks easily, fix that first.
If two boxes have a large gap between them, close or fill it.
Trying to pull unstable cargo into position using the ratchet usually creates poor strap angles.
Once the cargo shifts back, the strap becomes loose again.
Attach Straps to Strong Carrier Points
Look for designated tie-down locations first.
Many cargo carriers include rails or frame sections designed for securing loads.
Avoid questionable attachment points.
I would not trust:
- Plastic parts
- License plate brackets
- Thin unsupported mesh
- Exhaust components
- Folding handles
- Moving hinges not intended for tie-down loads
The strap may be strong, but the weakest attachment point determines whether the whole setup works.
Use Opposing Strap Directions
One strap across the top may not control every direction.
For many loads, using straps that pull in opposing directions provides better restraint.
A crossed arrangement may also help with sideways movement when suitable.
The exact pattern depends on your carrier and cargo shape.
Do not force every load into the same strap pattern.
Your goal is simple.
The cargo should resist forward, backward, sideways, and upward movement during normal travel.
Pull Out Excess Slack Before Ratcheting
This small step prevents several common problems.
Thread the webbing through the ratchet correctly.
Then pull the loose end firmly by hand.
Remove most slack before operating the handle.
You should not need endless ratchet strokes to make the strap tight.
If the center spool becomes packed with webbing, release it and start again.
A jammed spool can feel tight without creating enough cargo tension.
Tighten Until the Cargo Cannot Shift
More tension is not always better.
Your goal is to stop meaningful movement.
Push the cargo from several directions after tightening.
It should stay in position.
Do not continue tightening simply because the ratchet still has another click available.
Excessive tension can:
- Crush plastic totes
- Damage coolers
- Deform lightweight carrier rails
- Compress soft bags excessively
- Stress hooks and anchor points
Secure does not mean crushed.
Fully Close and Lock the Ratchet
After reaching proper tension, close the ratchet handle completely.
Do not leave it halfway open.
Check that the locking mechanism engages properly.
Then pull firmly on the strap.
If anything slips immediately, release the assembly and inspect it before driving.
Roll Up and Secure the Strap Tail
Unused webbing should stay contained.
Roll the tail neatly or secure it using an appropriate tie method.
Keep it away from:
- Tires
- Exhaust outlets
- Road surfaces
- Sharp edges
- Moving carrier parts
A tidy strap setup is easier to inspect later.
It also makes unusual movement easier to notice.
Reduce Excessive Hitch-Carrier Movement
A small amount of carrier movement can be normal depending on the setup.
However, excessive rocking deserves attention.
Check:
- The correct hitch pin is installed
- Required carrier bolts are tight
- Folding mechanisms are completely locked
- The receiver and carrier match properly
- Any compatible anti-rattle hardware is installed correctly
Do not use an anti-rattle device to hide damaged hitch components.
If the receiver, shank, pin holes, or carrier frame look damaged, fix that problem first.
Stop and Recheck the Load After You Start Driving
This is one of the easiest habits to adopt.
After beginning your trip, stop somewhere safe and inspect the load again.
Soft cargo may have settled. New strap webbing may have adjusted slightly. Boxes may have shifted together.
Re-tension only when slack has actually developed.
Also check the cargo again after:
- Rough road sections
- Hard braking
- Fuel stops
- Long highway stretches
- Sudden new rattling noises
- Noticeable handling changes
A quick inspection is much better than discovering a loose load at highway speed.
Should You Just Tighten a Loose Strap More?
Not always.
If the cargo simply compressed, repositioning it and restoring proper tension may solve the issue.
But repeated tightening will not fix a damaged ratchet.
It also will not solve a moving hook, unstable cargo pile, poor strap angle, or excessive carrier movement.
If the same strap keeps becoming loose, look for the cause before adding more tension.
Excessive tightening can damage cargo without making the load safer.
Plastic totes can crack. Cooler lids can distort. Soft bags can compress until the strap loses tension again.
Fix the movement first.
Then apply only the tension needed to hold everything securely.
How Tight Should Cargo-Carrier Tie-Down Straps Be?
Tie-down straps should be tight enough to prevent meaningful cargo movement without crushing the load or damaging the carrier.
After tightening, push the cargo forward, backward, and sideways.
It should remain stable.
Do not judge strap strength using breaking strength alone.
The more useful number for securing cargo is the strap’s working load limit.
Your complete setup also includes:
The hooks, stitching, ratchet, carrier attachment points, and load arrangement.
If one part is weaker than everything else, that weaker component can limit the system.
Always stay within the carrier’s rated cargo capacity as well.
Remember that hitch capacity and carrier capacity may not be identical.
Does Strap Type Affect How Often It Loosens?
Different tie-down types behave differently under load. Choosing the correct style can make securing your carrier easier, especially when cargo weight and shape vary.
Ratchet Straps
Ratchet straps provide strong, adjustable tension.
They work well for rigid or heavier cargo that needs firm restraint.
Their biggest advantage is controlled tension.
Their biggest disadvantage is that careless tightening can easily apply too much force.
Use straps with a clearly marked working load limit suitable for your load.
Cam-Buckle Straps
Cam-buckle straps are simpler and usually apply less tension.
They can work well for lighter cargo and items that could be damaged by heavy ratcheting.
They depend more on hand tension.
That makes them less suitable for certain heavy or unstable loads.
Cargo Nets
A cargo net can help contain several small items.
However, not every net is designed as primary cargo restraint.
Check its rating and intended use.
A net may work well as secondary containment over securely restrained cargo.
Bungee Cords
Bungee cords are convenient for lightweight items.
They are not a good replacement for properly rated tie-down straps when securing substantial cargo.
Elastic cords intentionally stretch.
That means they allow more movement than a properly tensioned cargo strap.
Use them only where their design and rating make sense.
When Should You Replace a Tie-Down Strap?
Replace a cargo strap when its condition makes reliable securement questionable.
Watch for:
- Deep cuts in the webbing
- Significant fraying
- Melted or glazed fibers
- Broken stitching
- Bent hooks
- Cracked hardware
- Badly corroded ratchet parts
- Missing or damaged teeth
- A ratchet that will not stay locked
- Webbing that repeatedly slips through the mechanism
Do not judge a strap only by age.
A lightly used older strap may remain usable longer than a newer strap dragged across sharp steel.
Condition matters more.
Inspect every strap before loading important cargo.
Common Mistakes That Make Cargo Straps Come Loose
Many loosening problems begin during loading rather than driving.
Common mistakes include:
- Leaving soft cargo loosely packed
- Stacking heavy items over compressible bags
- Putting most weight at the outer rear edge
- Using only one direction of restraint
- Leaving too much slack before ratcheting
- Packing excessive webbing onto the spool
- Leaving the ratchet handle partially open
- Hooking straps onto weak carrier parts
- Running webbing across sharp metal edges
- Leaving long strap tails loose
- Using bungee cords for heavy cargo
- Ignoring excessive carrier wobble
- Using damaged or unmarked straps
- Assuming breaking strength equals safe working capacity
- Tightening harder instead of fixing cargo movement
Before You Drive: A 60-Second Cargo-Carrier Strap Check
Before getting onto the highway, take another minute around the carrier.
Check that:
- The hitch carrier is installed correctly
- The hitch pin and required fasteners are secure
- Cargo weight is reasonably balanced
- Heavy gear sits low when practical
- Heavy gear stays closer to the vehicle
- Nothing can roll freely
- Hooks are completely seated
- Straps lie flat
- Ratchets are threaded correctly
- Ratchets are fully locked
- Cargo does not move when pushed
- Strap tails are secured
- Webbing does not rub sharp edges
- Nothing hangs near the road
- Cargo remains safely away from hot exhaust
- Required lights remain visible
- The license plate is not improperly blocked
If something looks questionable while parked, road vibration probably will not improve it.
Fix it before driving.
Final Words
Cargo-carrier tie-down straps usually loosen because something in the securement system changes after you begin driving.
The cargo may compress. The load may slide. A hook may rotate. The carrier itself may move.
Sometimes the ratchet really is the problem.
Instead of simply adding another click every time, identify where the slack started.
Check the cargo first, then the strap path, hooks, ratchet, and hitch carrier.
Once those parts remain stable together, your straps should require far less attention during the trip.
A secure cargo carrier is not about using maximum tension.
It is about creating a load that cannot easily move.
Related FAQs
This section answers a few common questions that come up when cargo-carrier straps repeatedly lose tension.
Why Do My Ratchet Straps Loosen After a Few Miles?
Cargo often settles during the first part of a trip, especially when you carry soft bags, blankets, or loosely packed gear. Road vibration can also shift rigid cargo enough to reduce the original strap tension.
Can Road Vibration Loosen Ratchet Straps?
Road vibration can contribute to loosening, but the ratchet does not always physically slip. Vibration often lets cargo settle, hooks rotate, or the carrier move, which changes the distance between attachment points and creates slack.
Do New Ratchet Straps Stretch?
New webbing can experience slight initial elongation under load. The amount depends on the webbing material and construction. Rechecking new straps after the load settles is a sensible precaution.
How Many Ratchet Straps Should I Use on a Hitch Cargo Carrier?
There is no universal number for every load. The correct amount depends on cargo weight, shape, strap working load limits, anchor locations, carrier instructions, and how many directions of movement need restraint.
Should I Cross Ratchet Straps on a Cargo Carrier?
Crossed straps can improve lateral restraint on certain loads. They are not automatically best for every carrier. Choose strap angles that control movement while keeping hooks securely seated and webbing away from damaging edges.
Can an Anti-Rattle Hitch Tightener Keep Cargo Straps Tight?
An anti-rattle device can reduce movement between compatible hitch components. That may help stabilize the carrier, but it cannot replace correctly installed cargo straps. The cargo still needs independent restraint.
Are Bungee Cords Enough for a Hitch Cargo Carrier?
Bungee cords are generally unsuitable as primary restraint for substantial cargo because they stretch by design. Properly rated tie-down straps provide more controlled restraint for heavier gear.
Should I Tie Off the Loose End of a Ratchet Strap?
Yes. Secure unused webbing so it cannot flap, drag, tangle, or rub nearby surfaces. Keep the tail contained without interfering with the tensioned portion of the strap.
Why Does Only One of My Cargo Straps Keep Loosening?
One strap may loosen repeatedly because cargo is shifting toward that side, its anchor point is moving, or its strap angle differs from the others. Inspect that section of the load carefully before tightening again.
What Should I Do If a Ratchet Strap Keeps Loosening After Retightening?
Stop relying on repeated tightening and inspect the complete setup. Check the ratchet, webbing, hooks, anchor points, cargo position, and carrier movement. Replace the strap if the locking mechanism or webbing appears damaged.

Jack Collins specializes in RV routes, trail access, and travel logistics. His how-to articles help RV and trailer owners plan smoother trips and avoid common mistakes. Every review focuses on performance, safety, and value.